Showing posts with label DIY Crafts and Patterns. Show all posts

Saturday, September 20, 2014

A Scarf That Everyone Needs Now! Soft Little Puffs of Awesome


Tubular Mesh Yarn, Love it!


Traditional Use of Ruffle/Mesh Yarn

Courtesy of WEBS Yarn Shop Retrieved 9/20/2014

My Mom, who is a Well Known Fiber Artist here on Long Island came up with this design for a simple, yet very convenient scarf. She is always shopping, buying and researching different fibers and yarns that come out in the market, this particular yarn she picked up in a sale bin at Joanne's Craft Stores.


The yarn is spun in a tube of very fine net like stitches. You can put your arm right through the middle of it to expand it, and it expands to a really wide tube. By sewing two of these tubes together at the ends you can create a fantastic tube scarf that squishes down to the size of a handball that easily fits into a pocket, purse or carry bag. They are super warm and come in an incredible array of colors.


These little loops are also great as a turtleneck addition to sweaters, shirts and jackets. They are so versatile that they can easily be added to any outfit, for a pop of color and lots of warmth.


My Mom calls them Neck Nests and displays them appropriately at Shows perched on tree branches with little eggs in the middle of them.


I am currently selling these little whispy nests of warmth in my Etsy Shop: 
https://www.etsy.com/shop/MaineCoonCrafts


Sunday, February 23, 2014

It's Fair Time Again, Spring Shows Starting with my Fav at Hallockville, Long Island


I love this Spring Show on the North fork of Long Island! Make a weekend out of it, visit the show, tour a vineyard and sample some of the local cuisine, great for the kids. Maine Coon Crafts will be Setting Up Shop, 

Come on down and say Hello!

Save the Date!

May 17 & 18, 2014

10 AM to 5 PM both days

6038 Sound Avenue, Riverhead


The Long Island Fleece and Fiber Fair is the first of its kind in the region to bring together the diversity of fiber arts activities! Visitors will see and learn how local artisans craft wool and other animal fiber into beautiful finished pieces of clothing and art. The fair provides two fun-filled days of demonstrations and hands-on learning that can be enjoyed by the whole family. Visit both days for a variety of demonstrations, workshops and local artisans selling their handmade supplies and products in the Naugles Barn Fiber Market! There is something for everyone, new and experienced fiber artists alike!  Enjoy lunch in the picturesque picnic area shaded by the apple trees. Maple Tree Catering will have a variety of local food and beverage items available for purchase. Martha Clara Vineyards will offer wine tasting, and the Hallockville Bake Shop will be offering delectable homemade baked goods, coffee and smoothies.


** For the safety of all animals on display at the event, please leave your dogs and pets at home. Thank you for your cooperation. **


Animal Displays-meet the sheep, llamas, alpacas, and angora rabbits that provide the fleece and fiber used by fiber artists!
Sheep Herding-watch experts and their dogs move the sheep!
Llama Obstacle Course- watch an exhibition of animal footwork!
Sheep & Llama Shearing- learn how fiber is harvested during informative demonstrations by an expert shearer!
Carding-see raw fiber being de-tangled and “teased” apart!
Dyeing-learn how dyes transform fleece and wool into colorful fiber!
Spinning- watch how spinners and their wheels turn fiber into spun yarn!
Knitting- learn the basics of how to knit your own finished pieces!
Felting- see how you can create your own fiber art pieces using this interesting technique!
Weaving- see the Hallockville looms in action turning fiber into cloth!
Quilting- watch demonstrations by quilting artisans and try it out for yourself!


The Long Island Fleece and Fiber Fair is Co-Sponsored by Hallockville Museum Farm and Long Island Livestock Company. All proceeds support the educational mission of the non-profit museum farm.


Additional information can be obtained by calling the Hallockville office at 631-298-5292 or e-mail hallockv@optonline.net


Sunday, January 26, 2014

DIY PomPom Hat Pattern


I love this pattern, it's easy and quick to make an adorable PomPom hat for your bestie. Add the monogrammed applique and it becomes a perfect gift or addition to a winter wardrobe. The pattern directions are for a 18 - 20" hat that would fit a 7 - 8 year old. I don't go by gauge, it makes me crazy, just too many variables, I go by eye and sizing. ☺


Hat Directions - Using Acrylic Yarn

Magic Ring, Chain 2, 9 DC in ring, join to first DC, ch 2
Row 2: 2 DC in each stitch around, join to first DC, ch 2 (18 DC)
Row 3: 2 DC in first stitich, 1 DC in next, repeat around, join to first DC, ch 2 (27 DC)
Row 4: 2 DC in first stitch, DC in next 2 stitches, repeat around, join to first DC, ch 2 (36 DC)
Row 5: 2 DC in first stitch, DC in next 3 stitches, repeat around, join to first DC, ch 2 (45 DC)
Row 6: 2 DC in first stitch, DC in next 4 stitches, repeat around, join to first DC, ch 2 (54)
Row 7 - 14: DC around (54 DC) do not fasten off, start first earflap
*You can add additional rows if you want a deeper hat

Earflaps

Row 1: Chain 2, HDC 10, chain 2, turn
Row 2: HDC across (10 HDC)
Row 3: HDC decrease, HDC in next 6, HDC decrease, chain 2, turn
Row 4: HDC across (8 HDC), chain 2, turn
Row 5: HDC decrease, HDC in next 4, HDC decrease, chain 2, turn
Row 6: HDC across (6 HDC)
Row 7: HDC decrease, HDC in next 2, HDC decrease, chain 2, turn
Row 8: 2 HDC decreases, chain 2, turn
Row 9: HDC decrease, fasten off leaving a long tail

*Skip 20 stitches along the front of cap, fasten on yarn and repeat for second earflap

SC around the entire hat and fasten off leaving a long tail

Attach Color Trim Yarn and SC around hat 2 - 3 times, fasten off

Braids

Cut ten 1 yard strands of the colors used, push through the last space in the earflap, knot close to the top, braid and knot at the bottom, repeat for the other side.

PomPom

Use a mix of the two colors to make a pompom of the size that you prefer, I do about a 4" wrap on my hat

Happy Crocheting!


Wednesday, January 22, 2014

Selling Success, Branding, Wrap it Up!


One of the things that I absolutely love about shopping on Etsy is when I get the package and it arrives in just over the top gorgeous wrapping, making even an ordinary order for parts super special. Wrapping and presentation is so important, it shows you care, and starts to establish "branding" for your Shop.


Your customer feels special when they receive their item beautifully wrapped, I know that I most certainly do. Your item looks special (we know it is), and it creates a "presence" for your line and your Shop. After all, if you are spending so much time developing, creating, photographing, advertising, the final arrival should be just as important.


Wrapping does not have to be expensive and it should represent your shop aesthetic. Check out Pinterest and Craft Sites for great ideas for packing and wrapping. I like to work with the banner in my shop, my logo and my design buzz to create my packaging. Like anything else, this too can be constantly evolving until you get that perfect combo.


Shipping a beautifully wrapped package is a must for selling success. A little time, investment and detail goes a long way and keeps em' coming back.

Tuesday, November 26, 2013

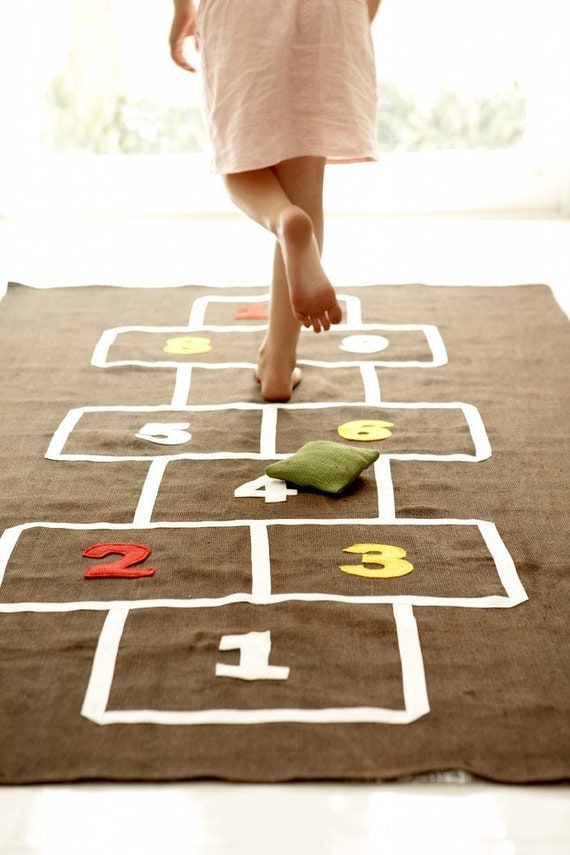
Inspirational Gifts for Kids - Hopscotch Indoors

Hopscotch Mat
Loving this, handmade in Africa and Available on Etsy
Browsing around the Web, I came across an item that I instantly fell in love with, indoor hopscotch mats. Immediately zooming back to childhood, hopscotch boards on the blacktop, looking for something to use as a potsy and hours of fun with my besties, I found this to be a wonderful, creative gift for a child on your list this holiday season. There are a multitude of commercial, handmade and handcrafted styles available, I myself would opt for the handmade, maybe using the interlocking foam tiles and painting fun stuff on them, using of course a bean bag animal as the potsy.


 Hop Scotch Mat
Available in the Current Catalogue

I love the idea of using these tile as a DIY project, not only as a great gift but for a rainy day project. 


Saturday, November 23, 2013

DIY Boho Headwrap Pattern - Great Gift for Teens, Tweens and Friends


This is a pattern for one of my most popular Headband, Hairwraps, Yoga Wrap or Dread Wrap. It works up  super fast and super easy, makes a great gift or perfect for yourself. Any questions just drop me a note and I will do my best to respond with a day. Happy Crocheting!

I use any type of yarn that I have on hand, cotton is great if this is for a workout headband, acrylic in colder months

Stitches & Abbreviations:

Slip Stitch - sl st
Chain - ch
Skip - sk
Triple Crochet - tr
Shell - 3 triple, ch 2, 3 triple
Triple decrease - YO twice, insert hook in next stitch, YO, pull up loop, YO, pull through 2 loops on hook (twice), YO, pull through 3 loops on hook


Row 1 - Ch 5, tr in 5th ch from hook (2 tr)
Row 2 - Ch 4, turn, tr in same st, tr (3 tr)
Row 3 - Ch 4, turn, tr in same st, tr in next 2 sts (4 tr)
Row 4 - Ch 4, turn, tr in same st, 2 tr in next st, tr in next 2 st (6 tr)
Row 5 - Ch 4, turn, tr in same st, tr in next 5 sts (7 tr)
Row 6 - Ch 4, turn, sk 3 tr, shell in next tr, tr in last st (2 tr, 1 shell)
Row 7 - Ch 4, turn, tr in same st, shell in top of last row's shell, 2 tr in last st (4 tr, 1 shell)
Row 8 - Ch 4, turn, tr in same st and next st, shell in top of last row's shell, tr, 2 tr in last st (6 tr, 1 shell)
Row 9 - 10 - Ch 4, turn, tr in next 2 sts, shell in top of last row's shell, tr in next 3 sts (6 tr, 1 shell)
Row 11 - Ch 4, turn, tr dec, shell in top of last row's shell, tr dec, tr in last st (4 tr, 1 shell)
Row 12 - Ch 4, turn, shell in top of last row's shell, tr dec (2 tr, 1 shell)
Row 13 - Ch 4, turn, tr in outside st of shell, sk st, tr in next st and ch space, tr in next st, sk st, tr in next 2                    sts (7 tr)
Row 14 - Ch 4, turn, tr, tr dec, tr in next 3 sts (6 tr)
Row 15 - Ch 4, turn, tr dec twice, tr (4 tr)
Row 16 - Ch 4, turn, tr dec, tr (3 tr)
Row 17 - Ch 4, turn, tr dec (2 tr)
Row 18 - Ch 20, sl st in 5th ch of Row 1


Sunday, November 10, 2013

The Best Baby Beanie Ever - DIY Holiday Gifts


Best Baby Beanie Pattern

Materials: I use Lily Sugar n' Cream Cotton for a Summer Beanie, or any soft Acrylic Yarn for the Fall and Winter, or a Cotton Bamboo that makes a super soft and stretchy hat.

Hook: H/8 - 5.00mm Hook 

Gauge: 12 sts x 10 Rows in hdc = 4" *I don't get too crazy with the gauge, I usually work by eye

Size: Newborn ( 14 - 15" or so )

Stiches:

Ch = Chain
Hdc = Half Double Crochet
Inc = 2 Stiches in 1 Stitch
Sc = Single Crochet
Sl St = Slip Stitch

Directions:

*I do not join rounds, this hat is crochet in one continuous spiral making it super simple, You just need to count on your increase rounds to get the right size

Rnd 1: Ch 3, Make 8 hdc in 3rd ch from hook
Rnd 2: Hdc Inc in each stitch around, 16 stitches
Rnd 3: Hdc in next stitch, hdc inc in next stitch (1 hdc, 2 hdc) around 24 stitches
Rnd 4: Hdc in next 2 stitches, hdc inc in next stitch (1 hdc, 1 hdc, 2 hdc) around 32 stitches
Rnd 5: Hdc in next 3 stitches, hdc inc in next stitch (1 hdc, 1hdc, 1 hdc, 2 hdc) around 40 stitches
Rnd 6 - 16: Hdc in each stitch around until hat measures 7" from top
Finishing Edge: Single Crochet  once around, slip stitch in next 2 stitches to finish off, work in ends

To Make this hat larger I just add more increasing rows, being sure to increase evenly. I use this as my basic beanie pattern for my Maine Coon Crafts Line. To personalize I add Appliques to make a truly Unique Gift.

Happy Crocheting!